Multivendor
Note
The Multivendor feature is currently only available through a license. For more information, contact support@shuup.com
The Multivendor Addon enables multiple features that facilitate the management of a multivendor marketplace. The marketplace owner can manage several Vendors more easily while vendors can select the products they want to sell, their prices as well as manage their stocks.
User-roles and Permissions
Permissions are the basic and Initial configuration all modern application should have. They are created to restrict features to a certain group of users. Shuup restrict the features using Permission Groups. A user can be linked to many permission groups. As the permissions must be explicitly granted (you must check what features are allowed to access), a user will accumulate all the permissions from all the linked permission groups.
- Common user roles for multivendor:
- Admin: (superuser). Superusers has all the permissions and can see all admin modules available.
- Staff: Can see admin modules defined for the staff group. The main role is to manage vendors, products and orders.
- Vendor: Can manage own products and manage vendor order lines, see vendor reports.
These roles are already created in the multivendor environment and can be tweaked to meet the project requirements.
See Permission Groups for more general informations on Permission Groups.
As a Vendor
Vendor Registration
- From the marketplace home page, navigate to /v/register to access the registration form.
- Fill out the Vendor information part with the name and address of your store, the Owner part is about you and the Login Information will allow you to access the admin Panel of the your store in the marketplace. If need be, you can update those informations later in the Vendor Settings.
- Click Register.
Notifications
After the registration, you will receive an email notification confirming that your registration is complete.
Note
You will not be able to log into your account on the marketplace until a marketplace staff member approves your registration.
You will get another email notification when your registration is approved.
Admin Panel
From the marketplace home page, navigate to /admin, type in your username and password and click the Login button to access the admin panel. You will be shown your dashboard with a summary of your sales.
Settings
Navigate to the Vendor Settings page by clicking Vendor Settings under the Settings category from the Shuup Admin menu.
You can update the name, description and logo of the Vendor and use the tabs on the left-hand side to update the contact address and the opening periods.
Click on the Go to vendor page button to be taken to your vendor page on the store front.
Product Management
Navigate to the Vendor Products page by clicking Products under the Products category from the Shuup Admin menu.
On this page, you will find all the products available to the marketplace. To find a product more easily, you can filter them by name. You can manage your stocks, start and stop selling products and set the price. If no price is set, the default price will be used.
Stock Management
Stock management is a crucial feature that all e-commerce platforms must have. Shuup is designed to be the more extendable as possible.
To a product be able to be purchased, it must have at least a Supplier set. Suppliers are responsible to return whether a product can be purchased for a given quantity (and other context values such as the current customer).
In the multivendor environment, each Vendor is a Supplier behind the scenes, and the vendor can manage only the products it supplies.
Managing Stocks
To manage stocks, go to Product > Products. Pick a product and click on the Stock Management section.
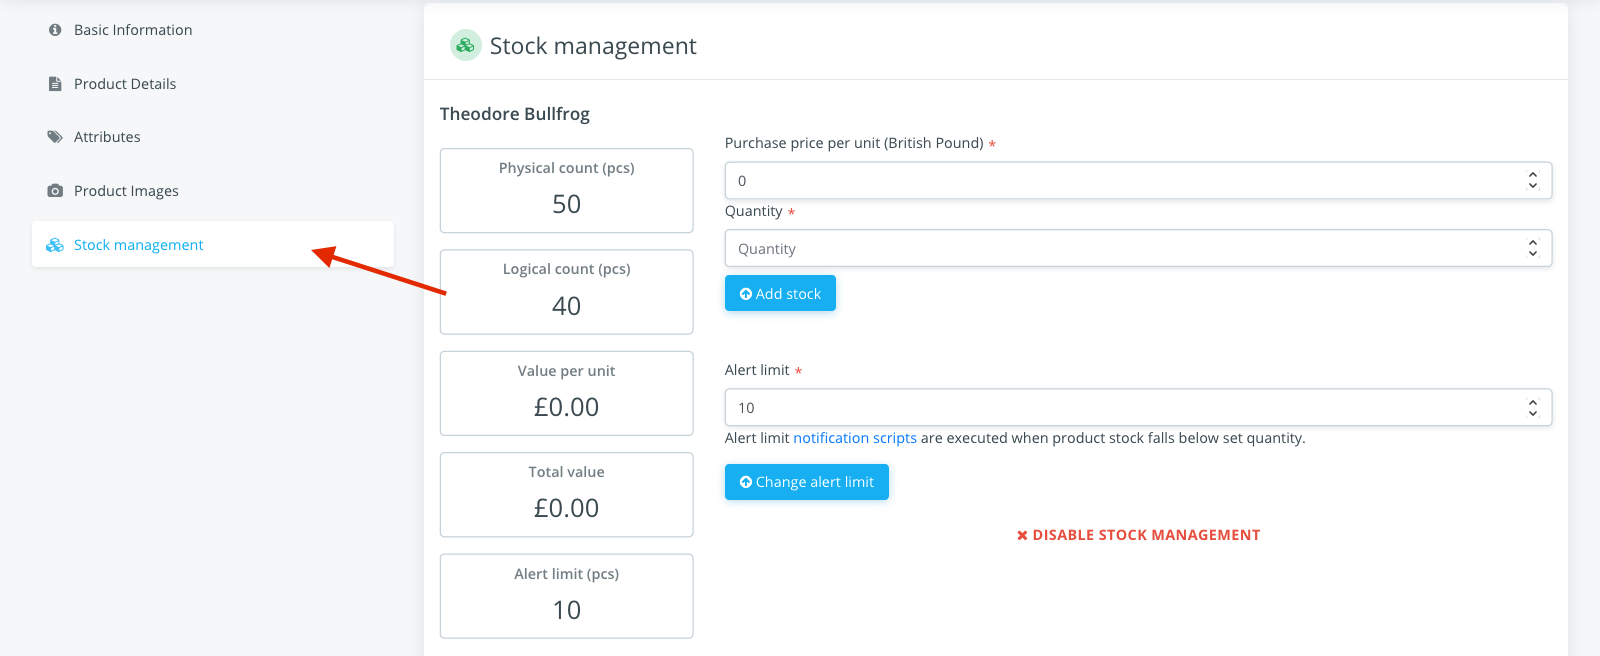
On this management panel it is possible to update stocks, alert limit and disable the stock management for this specific product.
The initial management status is configured per-project. If the stock management is disabled, the product can be purchased unlimitedly – no stocks are checked.
To update stocks, fill the Quantity field and press the Add stock. The purchase price can be optionally filled for future reports. Stock will be incremented if the quantity is a positive number and decremented if the quantity is a negative number.
The alert limit can also be set and when Notifications addon is enabled, it will trigger an event that can be configured send email to users or any other logic.
Stock reports
Stocks can be listed in a simple way using a stock report. Go to Reports and select the Vendor Product Report, fill the filters if needed and press the Get Report button.
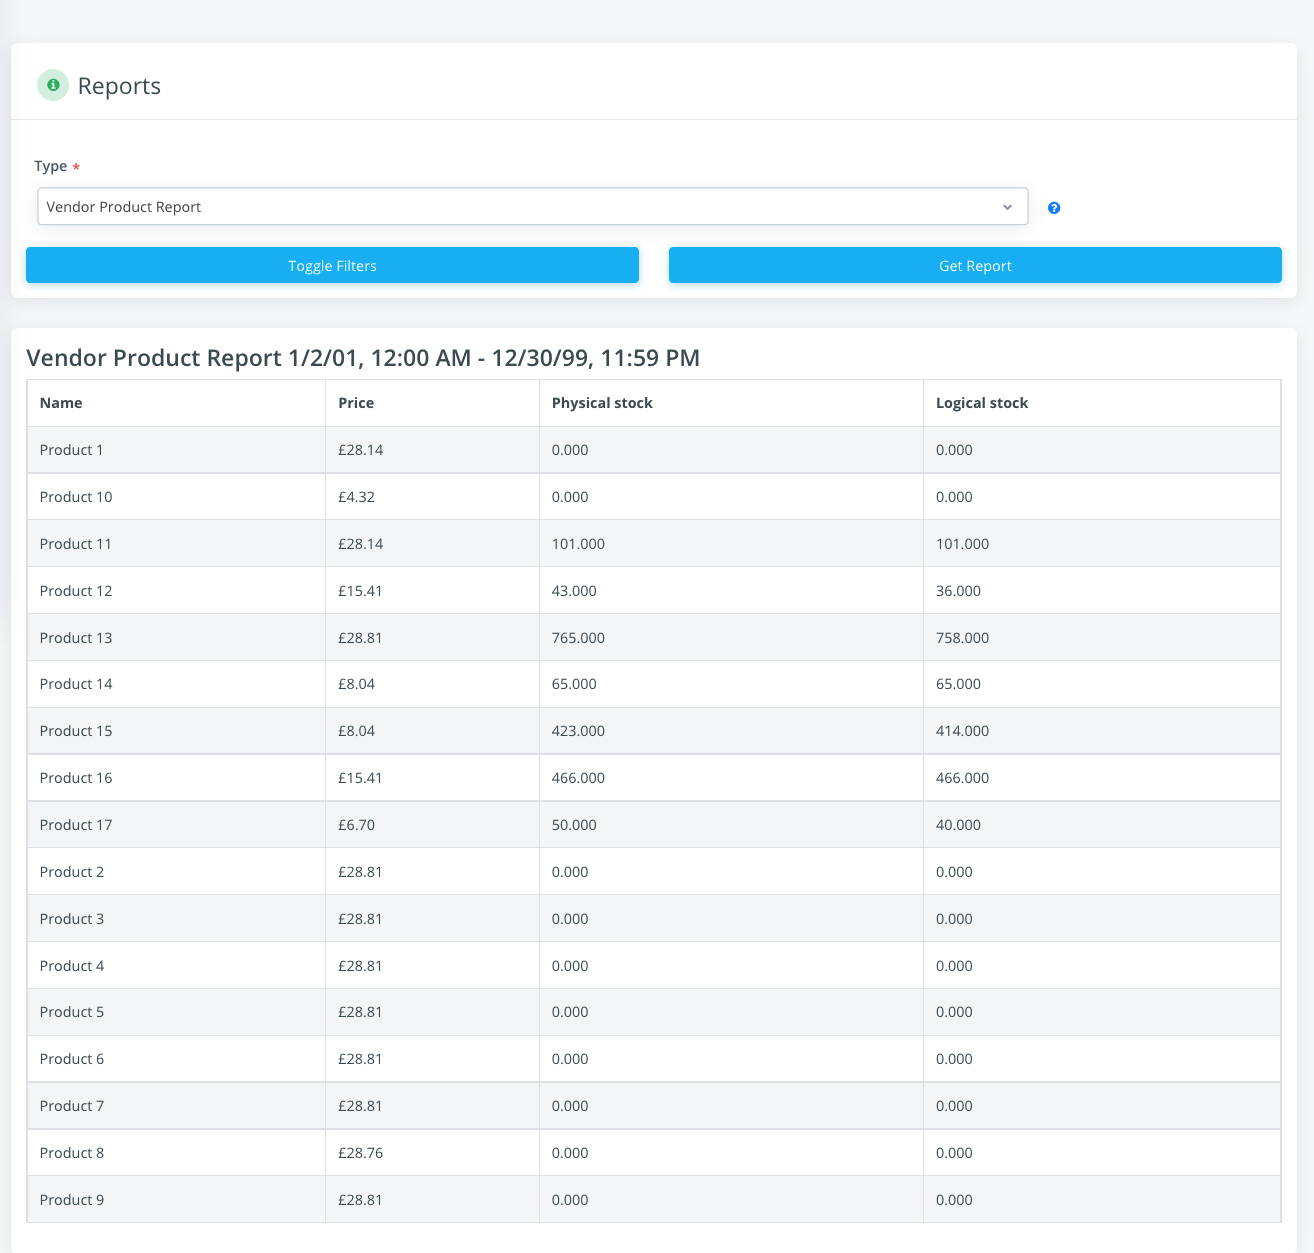
The report shows the product name, price and the current stock status. Logical stock is the number of products available for sale and Physical stock is the number of products that are physically in stock and they are waiting to be shipped. Both numbers will be equal when all products from their orders are fully shipped.
See Stock Management for more general information about Stock Management.
Orders
Navigate to the Vendor Orders page by clicking Vendor Orders under the Orders category from the Shuup Admin menu.
On this page, you will find all the orders that have been made for the vendor. There are multiple filters available to single orders out.
Click on an order to see the order information like the order number and reference, the customer name, email, billing and shipping address as well as the product name, quantity and price.
Depending on your marketplace configuration, it might also be possible to create a shipment, set the tracking code or the order status.
As a Marketplace Staff Member
Create a new Vendor
- Navigate to the Vendors Management page by clicking Vendor Management under the Settings category from the Shuup Admin menu.
- Click on the + Create new button.
- Fill out the Vendor’s name. You can also add a description, a logo and management users. Make sure the Enabled and Approved checkboxes are selected.
- Click on the Contact Address tab on the left-hand side to fill out the contact name and address.
- You can set up opening periods in the Opening periods tab on the left-hand side.
- Click on the Save button.
The Vendor will receive an email notification for the registration and another one for the approval if the Approved checkbox was selected during the creation process. Vendors can log in their admin panel as soon as they are approved.
See Notifications to set up customized Notifications.
Approving a Vendor
- Navigate to the Vendors Management page by clicking Vendor Management under the Settings category from the Shuup Admin menu.
- Select the Vendor you want to approve.
- You can edit the Vendor’s informations such as their name, description logo, contact address and opening periods.
- Select the Approved checkbox.
- Click Save.
The Vendor will receive an email notification once their registration is approved. Vendors can log in their admin panel as soon as they are approved.
See Notifications to set up customized Notifications.
Orders from all Vendors
Navigate to the Vendor Orders page by clicking Vendor Orders under the Orders category from the Shuup Admin menu.
On this page, you will find all the orders that have been made for all the vendors in the marketplace. There are multiple filters available to single orders out.
Click on an order to see the order information like the order details, the customer name, email, billing and shipping address as well as the product name, quantity and price.
Depending on your marketplace configuration, it might also be possible to create a shipment, set the tracking code or the order status.
See Orders for more information.
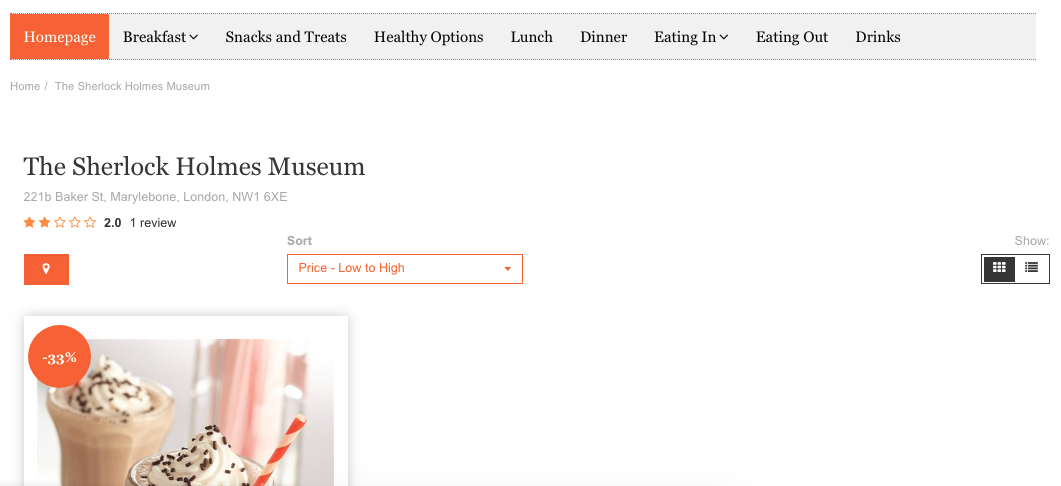
Vendor Reviews
Vendor reviews module stores users’ ratings for vendors.
Requirements to a review be visible in the storefront: - Users can only create reviews for vendors of completed orders - The review should be approved by staff users - Xtheme plugin must be placed in placeholder inside the vendor detail view
Creating a vendor review
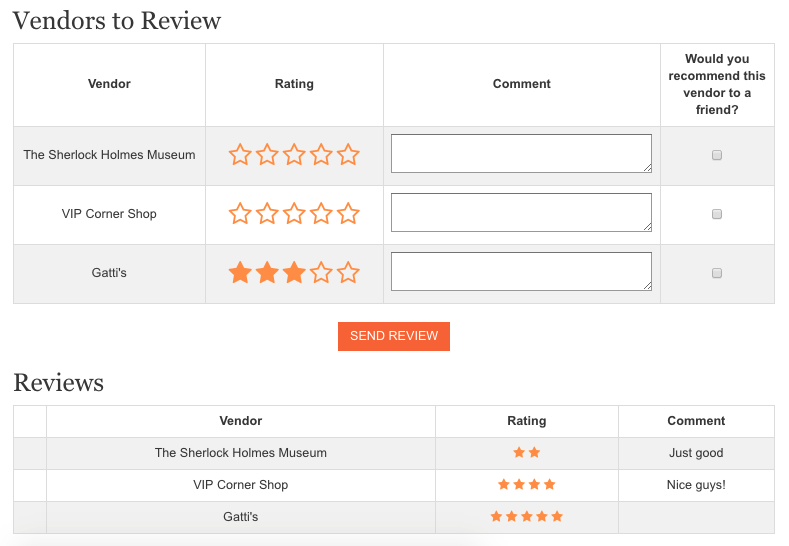
After the user has placed his order and the order is in a completed status, the user can create the review in the Customer Dashboard:
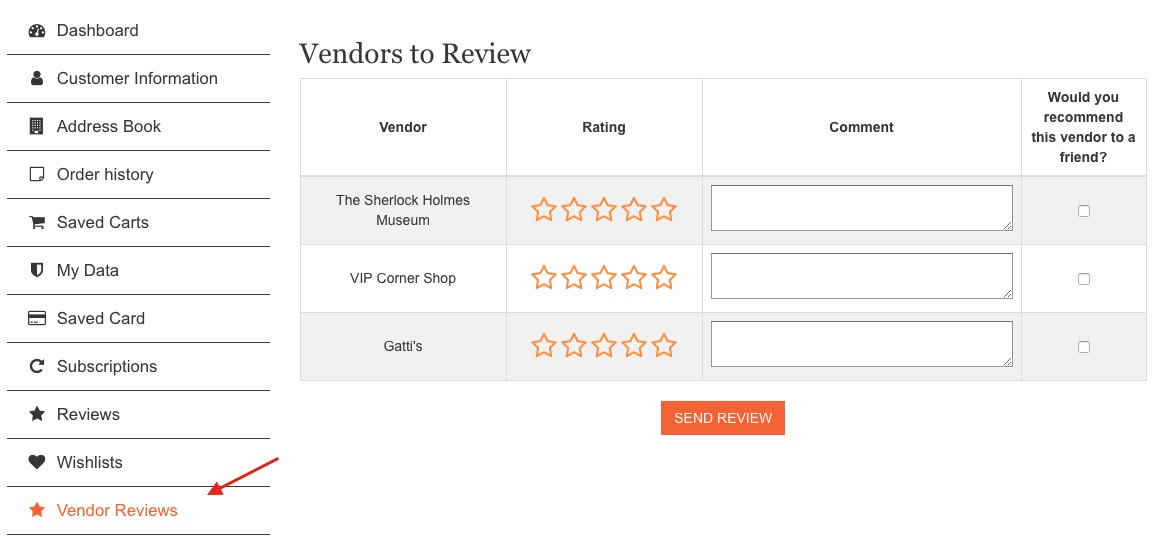
The user must select the star rating also add some comment and check whether he would recommend that vendor to a friend. After that the review will be available for visualization. The user can change the vendor review at any time by submitting the reviews again.
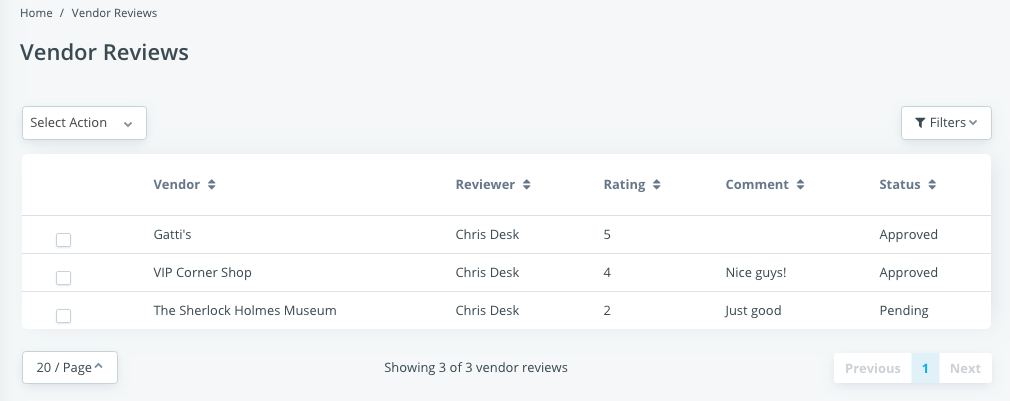
Once the review is sent, it should be approved by a staff user in Admin > Settings > Vendor Reviews:
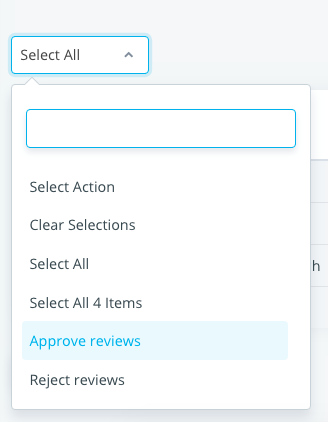
The staff must select all the reviews he wants to approve/disapprove and select the respective action in Mass Action dropdown:
Done. After the review is approved, it will be visible at the storefront.
Configuring the plugins
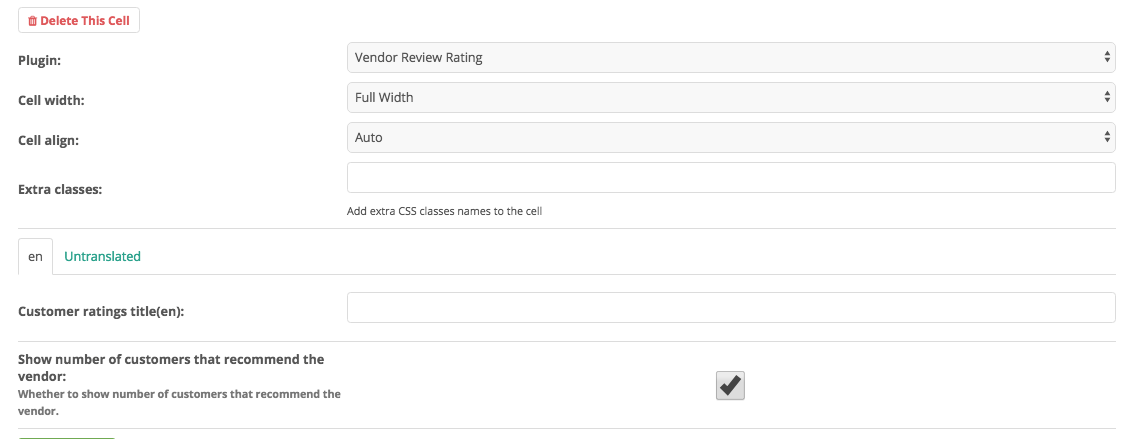
The module provides a plugin to render the customer ratings in places where a vendor is available in context, like the Vendor Detail page. You must add the Vendor Review Rating plugin and configure it as needed:
After all these configurations, the vendor review module will be working as it should.